Friday, February 12, 2010

Chicken Scrampi II

I thought today was the 13th and tomorrow is Valentine's Day. No special plans since it's just another day. From my  point of view, if we go out to eat at a restaurant, it could cost little more  (just like any other special occasion) and flowers could cost twice the price because so many people want to get flowers for their love ones.. I told my hubby no need to go out and no need buy flowers... I planned to cook something special..  hehe.. I planned to start with breakfast in bed,  skip lunch then dinner and last but not least the dessert.. So we went to the supermarket to get some of the items that I need..  When we got home, I overlooked one item from my list. So I asked my hubby, if he could go to the store tomorrow to get it for me so that I prepare for  special dinner tomorrow. He said "Why tomorrow??? Its 13th"  Then I insisted that tomorrow is the 14th... He showed me the calender... hahaha... I got confused with the dates again.. But I felt relief though because I still have another day to prepare my last minute DIY Valentine's card for him.. Lol!!

For us, this week is all about pasta. On Monday, we had Spaghetti Alfredo, Wednesday was Spaghetti in Tomato sauce (ground beef and mushroom) and today, its Vermicelli Chicken Scrampi II.  I saw the chicken scrampi recipe at Allrecipes and thought chicken scrampi would be nice with pasta. After carefully read through a great amount of reviews and I followed some good suggestions...

Chicken Scrampi II (Allrecipes)

Ingredients:
1/4 cup butter
2 tbsp olive oil
1 tsp dried parsley
1 tsp dried basil
1/4 tsp dried oregano
4 cloves garlic, thinly sliced
salt to taste
2 tbsp lemon juice
4 boneless chicken breast halves, cut into cubes
Green pepper, diced (optional) 
Parmesan cheese (optional)
Shredded cheese (optional)

In a skillet heat the butter and oil over medium high until the butter melts. Add the parsley, basil, oregano and garlic and salt and mix together in the skillet. Stir in lemon juice.

Then add the chicken and saute for about 3 minutes or until white. Lower the heat and cook for about 10 to 15 minutes or until chicken is cooked through and the juices run clear. More butter can be added if needed. 

Notes: 

I boiled 7 oz vermicelli pasta, drained. Then mixed with chicken scrampi and also the Parmesan cheese at the last minute before removing from the heat. 
  

Thursday, February 11, 2010

Simply sensational truffles ♥♥

 
These rich and elegant (mine not so elegant.. lol), bite-sized petit four Chocolate truffles.. hmm.. yummy..  Simply could not resist any one of them... yesss.. that's including any flavors.. I like them all.. hehe.. I am thinking of making truffles as one of Valentine's present for my hubby. *wink*  I think these truffles perfect as party desserts or for a present because they are so easy to make. Simply sensational!! :))
 
Recipe from Kraft (check out their video)

Ingredients:
2-1/2 pkg. (8 squares each) BAKER'S Semi-Sweet Chocolate (20 squares), divided
1 pkg.  (8 oz.) PHILADELPHIA Cream Cheese, softened
decorations: chopped PLANTERS COCKTAIL Peanuts, multi-colored sprinkles 
 
MELT 8 chocolate squares. Beat cream cheese with mixer until creamy. Blend in melted chocolate. Refrigerate until firm. 
SHAPE into 36 balls. Place on waxed paper-covered baking sheet. 
MELT remaining chocolate. Use fork to dip truffles in chocolate; return to baking sheet. Decorate, then refrigerate 1 hour.
 

Saturday, February 06, 2010

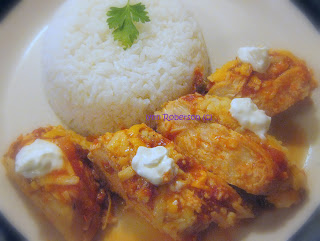
Quick and Easy Mexican Chicken

Dear Mr SUN, 
please come out... Its been so gloomy the past few days...  I want to go out and play.... Lol!!!

Well, here a quick and easy chicken recipe, Mexican style. Yummy!!!

Quick and Easy Mexican Chicken
By: Karen Taylor (Allrecipes) 

Ingredients: 
4 skinless, boneless chicken breasts
1 cup salsa
1 cup shredded Cheddar cheese
1 clove garlic, minced
1 pinch salt
1 pinch ground black pepper
1 pinch ground cumin

Preheat oven to 375 degrees F (190 degrees C).
Heat a greased skillet to medium. Rub chicken pieces with garlic, salt, pepper and cumin to taste and add to hot skillet. Cook until brown on both sides and no longer pink (10 to 15 minutes).
Transfer meat to 9 x 13 inch baking dish or casserole dish, top with salsa and cheese and bake at 375 degrees F (190 degrees C) for 15 to 20 minutes (until cheese is bubbly and starts to brown.)

Serve over rice or buttered noodles. You like to drop some sour cream on the chicken too..  :)

Wednesday, February 03, 2010

Popiah Goreng (Deep-fried Spring Rolls)

Spring rolls are delicious starters. You have them plain or dip in the sweet chili sauce. Ever since I introduced these spring rolls to my hubby, he loves them. ;) Deep fried spring rolls are HOT favorite with my family. You will never see any left overs.  There are two types of spring rolls; 
Fried vs. Non Fried
Fried spring rolls are smaller and crisper. They can be sweet or savory. Typically prepared with meat or vegetables.  
Non-fried spring rolls are bigger and more savory. Usually the fillings are pre-cooked ingredients.  ~~~~ Both types are yummilious!!!!!!!!!

Spring rolls can be found in many Asian countries. I was so happy to get Tee Yih Jia’s Spring Roll Pastry at the Asian store. I also found out that this Singapore brand is the world leading manufacturer for spring roll wrappers. Yippy!!! They come in various sizes (plain or with egg). Here is a picture of the package look like.

The filling is my mum's recipe. No pre-cooked. Simple and easy. She used jicama (we call them sengkuang). I couldn't get them here, so I  substitute for sweet potatoes. Others like to add beansprouts but I do not like them. Next time, I will add cooked baby shrimps or chicken meat to my fillings. ;)

Here is what I used:
1 package spring roll wrapper (thawed if frozen) 
1 big sweet potatoes, peeled and finely julienned
3 carrot, peeled and finely julienned
1 carton mushroom - chopped
oyster sauce (I just throw in, didn't take the measurement, I think shld be ard 1/4 cup)
abt 1/2 tsp chili powder
a dash white pepper
cooking oil
Prepare the spring roll filling: In a large bowl, combine the sweet potatoes, carrots, mushrooms, oyster sauce, chili powder and white pepper. Using a fork, mix together well. Rest for 5 minutes. Then drained.

To assemble rolls: Take some spring roll wrapper and cut into half. *this to ensure the spring roll wont break when cooking in the hot oil*
Place a spring roll wrapper on a clean working surface. Place the half wrapper on top of the whole wrapper (corners together) closest to you, then place one heaping Tbsp. of the filling on the half wrapper(if using large wrappers, you will need more). Spread the filling lengthwise along the spring roll wrapper nearer the end closest to you. Fold the left and right sides of wrapper over filling, then lift up the wide end nearest you and tuck overtop. Roll to the other end. Seal the wrapper by moistening the seam with a dab of water. (you may like to see the steps shown in my "Rolling those wraps... traditional chinese egg rolls".

Pour the oil in a wok or a pot. Heat the oil over medium-high heat. Place five to six spring rolls at a time. Leave 1 to 2 inches of space between the rolls. Deep-fry until it turns golden brown. Drain on paper towels before serving. Continue to fry entire batch is complete.

Serve the spring rolls immediately with a sweet chili sauce for dipping.

Notes:
Try not to include too much of the liquid from the filling. Drier filling is better. 

The skin may dry rather fast.To avoid this, simply place a damp (not wet) kitchen paper over it after you wrapped. Spring roll can be made a day ahead. Cover them with a damp paper towel, then wrap well in plastic wrap, and refrigerate. Refrigerating firms and toughens the wrappers. If they are little dry, wipe them gently with a damp cloth.

Deep frying spring rolls gives them a golden, crispy outer shell while leaving the veggies inside moist and tender. Fry spring rolls to a perfect golden color by keeping the oil temperature just right. Increasing the oil temperature to reduce cooking time can result in undercooked insides and burnt outer shells.

Tuesday, February 02, 2010

Nasi Goreng Tuna ( Fried Rice Tuna)

Yesterday, after hubby came home from work, we went to visit our friends.  Then we decided to go back home before it gets dark. Before going to the main road, we had a small road accident. Thankfully, we were not hurt but I was petrified. Even when you drive with cautious, accident happened out of nowhere. The speed was not even at 20... the truck skidded in the curve on the icy+wet road and went into the embankment. Luckily no other vehicles around when it happened. We tried but unable to get the truck back on the road. Slowly, one by one came.. I think there were about 6-7 vehicles stopped by. Three of them said, they go back and get their truck to help us. I am thankful, that there are some nice and helpful people. My hubby and I want to shout out to the couple who helped us. They drove home asap and came back. With their help, we managed to get out and get home. Unfortunately, we didn't get their name. To the couple, we really appreciate your help. Thank you and god bless you. 

Anyhoo, for dinner, I cooked a simple  nasi goreng tuna. It could be better if only I had some slices of tomatoes. It was simple and delicious. (I had more servings than hubby.. hehe) This is one of my favorite food. There are some dishes that both of us have different taste.  What he like, I may not really like and vice versa. Whenever I cook something that I want to eat and knows he will not like as much as I do, I will cook another dish that he would go for more bites. For this nasi goreng tuna, I made some home-made spring rolls to go with it.. Hubby had many servings of these spring rolls. Lol!!!

Ingredients:
2 cups rice, cooked
1 can tuna flakes, divided, drained
2 tbsp blended cili
3 cloves garlic, chopped
2 eggs
salt to taste
cooking oil

Stir the rice with a fork to separate the grains. Heat wok or large saucepan over medium heat, place garlic and saute until fragrant. Add blended chili and stir for a minute. Add 1 tablespoon of tuna and salt to taste, continue to stir. Add cooked rice and mix. Then push the rice to the sides and break the eggs. Scramble the eggs and mix it in with the rice, stirring briskly for 5-10 minutes. The remaining tuna, sprinkle with some lemon juice and heat in the microwave for 1 minute. Serve nasi goreng tuna, topped with cooked tuna and chopped spring onions.

Related Posts Plugin for WordPress, Blogger...