Friday, May 07, 2010

Strawberry tart

Finally I made my strawberry tart. It may not be the best looking strawberry tart but the taste was super delicious! Reminds me of Delifrance's fruit tart in Singapore. The sweet pastry crust was fantastic. Next time, I am making this again and use melted chocolate over the base..

If time does not permit to bake one, buy one at the supermarket. Once the pastry shell has been baked and cooled, it is a good idea to seal the crust by spreading a thin layer of apricot glaze or melted chocolate over its base to prevent the crust from getting soggy. There different types of fillings you can use, like Lemon curd or cream cheese filling. For this one, I use the traditional pastry cream.I didnt have any fluted tart pan so I used Pyrex's 8" pie dish. 

Strawberry Tart 
(adapted from Summer Berry Tart, Desserts & After Dinner Treats Step-by-Step book)

Ingredients:
1 cup plain flour
90g butter
2 tbsp icing sugar
1-2 tbsp water 

To make crust: Preheat oven to moderate 180C/350F. Process flour, butter and icing sugar in food processor, using pulse action, for 15 seconds or until fine and crumbly. Add almost all the water, process 20 seconds or until mixture comes together; add more water if necessary. (It was quite hot here so I placed the pastry in the refrigerator for about 5-10 minutes before rolling the pastry.) Turn onto lightly floured surface, press together until smooth. Roll pastry to fit 20cm round fluted flan tin. Line tin with pastry, trim edges; refrigerate 20 minutes. Cut a sheet of greaseproof paper to cover pastry-lined tin. Spread layer of dried beans or rice evenly over paper. Bake 15 minutes. Remove from oven, discard paper and rice. Return to oven for 15 minutes, or until lightly golden.

Filling:
3 egg yolks
2 tablespoons caster sugar
2 tablespoons cornflour
1 cup milk
1 teaspoon vanilla essence

To make filling: Place egg yolks, sugar and cornflour in bowl, whisk until pale. Heat milk in small pan until almost boiling, remove from heat. Add milk gradually to egg mixture, beating constantly. Strain into pan. Stir constantly, over low heat 3 minutes or until it boils and thickens. Remove from heat, add essence. Transfer to bowl, cover with plastic wrap; cool. 

Clear glaze
1/4 cup granulated sugar
1/2 cup water or fruit juice (clear apple juice)
1 tbsp corn starch or potato starch
1 tbsp corn syrup

To make glaze: Bring sugar to boil with half of the water or fruit juice. Dissolve cornstarch in the other mixture cook. Stirring until mixture thickens and clear. Stir in corn syrup. Bring to boil then remove from heat. Cool before brushing over top of fruit.

To assemble tart: To remove the tart from the fluted sides of the pan, place your hand under the pan, touching only the removable bottom not the sides. Gently push the tart straight up, away from the sides. The fluted tart ring will fall away and slide down. Spread a thin layer or apricot glaze or melted chocolate over the bottom and sides. Spread filling in cooled pastry shell. Decorate the tart,  you'll need 2-3 cups of mixed fruits (berries, sliced kiwi, plums, bananas, pineapple or melon). Arranging the fruit on the tart can be done either randomly or in concentric overlapping circles, starting at the  outside edge. Try to cover all the pastry cream with fruits so that no pastry cream is showing through. Brush gel over fruit with a pastry brush.

This fruit tart is best eaten the same day as it is assembled. Cover and refrigerate any leftovers.

Here is another picture of my strawberry tart.

Sunday, April 11, 2010

Lemon Cream Cheese Frosting

No cake is complete without a frosting. Even if you use from the cake mix recipe. I made a simple lemon cream cheese frosting for my golden butter cake. The result was sweet, tangy, and delectable. It was fantastic!

Lemon Cream Cheese Frosting
Ingredients:
  • 1 (8 ounces) package cream cheese
  • 1/4 butter, softened
  • 3 tbsp lemon juice
  • 2 tsp lemon zest
  • 1 tsp vanilla extract
  • 4 cups confectioners' sugar
Beat cream cheese and butter. Then add lemon juice, lemon zest, and vanilla extract together until smooth and fluffy. Add confectioners' sugar gradually until finish; beat until creamy. Add more icing sugar or juice as needed for easy spreading.


Notes:
  • Use fresh lemon and squeeze the juice out, much better than using lemon extract only.
  • It is very important that the frosting be the proper consistency so it spreads easily over the baked good, yet at the same time adheres to the surface. 
  • Never frost a cake or other pastry that is still warm as the frosting will melt into the baked good or become too thin and run.
Have a good week ahead. :))

Saturday, April 10, 2010

Bulgogi (Grilled Marinated Beef)

Annyeonghaseyo ~~ that is "Hello" in Korean. Our dinner tonight was Bulgogi with Japanese rice. Bulgogi is a Korean dish that usually consists of marinated thin slices of sirloin or other prime cuts of beef, although chicken may also be used. It is traditionally grilled, but pan-cooking is common these days.

Bul is the Korean word for fire and gogi is meat, therefore it translates into fire meat. This refers to the cooking technique over an open flame rather than the dish's spiciness. The term is also applied to variations such as dak bulgogi (made with chicken) or dweji bulgogi (made with pork), although the seasonings are different.

This dish is sometimes served with a side of lettuce or other leafy vegetable, which is used to wrap a slice of cooked meat, along with a dab of ssamjang, kimchi, or other side dishes, and then eaten as a whole.  It would be nicer if only I have kimchi and ssamjang, but without those, my Beef Bulgogi was still super delicious. It's just like the Beef Bulgogi at the food court in Singapore. This recipe is definitely a keeper.. Yum-yum.. :))

Beef Bulgogi recipe adapted from Epicurious
Ingredients:
  • 1/4 cup low-sodium soy sauce
  • 2 tablespoons sugar
  • 1 tablespoon sesame oil
  • 1/4 apple, coarsely grated (about 1/4 cup) (optional)
  • 1/2 medium onion, coarsely grated (about 1/2 cup)
  • 2 cloves garlic, minced (about 1 teaspoon)
  • 1/2 teaspoon fresh ginger, peeled and finely grated
  • 1 teaspoon sesame seeds, toasted, plus additional for garnish
  • 1/4 teaspoon freshly ground black pepper
  • 1 pound beef rib-eye or sirloin steak, trimmed of excess fat and thinly sliced
  • 1 carrot, thinly sliced
  • 2 tablespoons vegetable oil
  • 1 green onions, finely sliced - garnishing
  • parboiled cabbage leaves
  • 1 cup cooked Japanese rice
In large bowl, whisk together soy sauce, sugar, sesame oil, apple, onion, garlic, ginger, sesame seeds, and pepper. Let marinade stand 30 minutes at room temperature, then add beef and toss to coat. Refrigerate, covered, 2 to 4 hours.
In large skillet over moderately high heat, heat oil. Remove beef from marinade, draining it very briefly over bowl to remove excess liquid, and then cook until meat is just short of desired completion. Add carrots and cook for an additional 3 minutes.
Remove beef from heat. Garnish with green onions and sesame seeds. Serve immediately with rice.

simple Korean style for dinner... :))
 Notes:

  • Marinated for two to four hours to enhance the flavor and its tenderization. 
  • You could purchased the thinly sliced rib-eye steak from a Korean market.
  • Slicing your own rib-eye or sirloin steak across the grain in paper thin slices. Partially freezing the beef helps with cutting clean slices.(I still need to work on slicing the meat.. not good at it..)
  • You could use the normal white rice but I think Japanese rice is better for its its unique stickiness and texture.
Enjoy!

Friday, April 09, 2010

Tempura Batter -- Kakiage


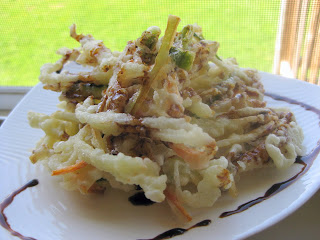
One of my favorite Japanese side dish is Kakiage. It is a type of tempura which is made with mixed vegetable strips. Besides having sushi at the  Japanese restaurants, it is like a must to order kakiage, fried tofu, soba noodles and potato croquette. So if you bring me to a Japanese restaurant, you'll know what I'll be ordering.. hehe...

Traditionally, tempura batter is mixed in small batches using chopsticks for only a few seconds. It is important to use only cold water and leave the batter lumpy. This will result in the unique fluffy and crisp tempura structure when cooked. The first time, I had over mixed the batter, and the results were disappointing. Here, besides using the vegetables, I also used firm tofu. They were simply yummilious!!!! Now I know how to make my own tempura batter. I do not miss my favorite side dishes at the Japanese restaurant anymore... I still have to work on my sushi.. hehe.... 

Tempura Batter
Ingredients:
1 egg
1 cup iced water
1 cup all purpose flour
pinch of salt

I used potatoes, carrots, zucchini, green peppers and onions (cut into strips) for my Kakiage. You may like to use mushrooms, shrimps or scallops too.

Beat an egg in a large bowl. Add ice water in the bowl. (I added the ice into the batter to make it cold) Add flour and salt in the bowl and mix lightly.Do not over mix. (its okay to leave lumps in the batter).

Heat oil to 340 degrees F in a deep pan. Add the mixed vegetables strips in the tempura batter, and mix together. (if you have ice in the batter, remember not to scoop the ice to the oil)

Take a scoop of the mixture with a large spoon and slip into the oil. Shape the piece, using chopsticks or a cooking tong until firm. Deep-fry until browned on both sides. Drain and serve immediately.


Here, I serve with black sweet sauce. Yum-yum!!!

Notes:
  • Use only cold ice water.
  • Over-mixing the batter will result in activation of wheat gluten, which causes the flour mixture to become chewy and dough-like when fried.
  • If the batter becomes warm while you are deep-frying, add ice to the batter, or by placing the bowl inside a larger bowl with ice in it.

Have a good weekend. :)

Friday, April 02, 2010

Chicken Macaroni Soup

Simple, tasty and fills you up just by having one bowl of shredded chicken macaroni soup.. We often eat this soup during cold weather as it warms us up.  Although its getting warmer now here, I was in the mood of having some chicken macaroni soup. hehe... My version is suitable for hub as he doesn't really favor spicy food.. If you want it hot, add some chilli powder or soy sauce with fresh slices of the red/green chilli. yum*yum* :))

Ingredients:
200 gm macaroni - boiled until tender and drained
cooked shredded chicken
2 cloves garlic - peeled and mashed
4 cups water (or adequately)
1 potato - peeled and slice thinly-round
1 carrot - peeled and slice slant/round
1/2 cup peas
1 cube chicken essence
salt to taste
white and black pepper to taste
1 tbsp vegetable oil
chopped green onions and fried shallots for garnish

Heat oil in the pot. Saute garlic until golden. Add water, potatoes and chicken essence. Let boil for 20 minutes. After 20 minutes, added the carrot. Let it boil another 10 minutes. Add salt, white and black pepper to taste. Turn to very low heat. Add macaroni and shredded chicken. Stir well. Then turn off heat and serve while it is hot. Garnish with green onions.


Hope you had a Good Friday and Happy Easter Day in advance!!!!!!
Related Posts Plugin for WordPress, Blogger...