Showing posts with label Western. Show all posts

Sunday, January 15, 2012

Yorkshire Puddings


My first home-made Yorkshire Puddings. It was easy to make. It was funny when I opened the oven door and saw that my Yorkshire Puddings rose on one side. hehe.. but seriously they were delicious. I used the recipe from Steamy Kitchen. :) 


Yorkshire Pudding
Ingredients:
1 1/2 cup all purpose flour
3/4 tsp table salt
3 large eggs, at room temperature
1 1/2 cups milk, at room temperature
3 tbsp beef fat

In a large bowl, whisk together eggs, milk and salt. Sift in the flour in three stages, each time whisking until flour disappears before adding in more flour. Let rest at a room temperature for 30 minutes and up to 3 hours.
When the roast is finished, spoon out 3 tablespoons of beef fat. Turn oven to 450 degrees F. Stir 1 tablespoon of the beef fat into the batter. In a muffin pan, fill each cup with 1/2 teaspoon of the remaining beef fat. 
When oven has reached temperature, place muffin pan with fat into oven for 3 minutes until smoking hot. carefully take out pan and pour batter into each cup, filling to 2/3 full. Immediately return to oven and bake for 20 minutes. Do not open oven door during baking or the Yorkshire Puddings will collapse. Reduce heat to 350 degrees F and bake an additional 10 minutes until golden brown. Remove from oven, pierce each Yorkshire Pudding with toothpick to allow steam to escape and prevent them from collapsing.


Thursday, October 27, 2011

Debdoozie's Blue Ribbon Chili


There's nothing better than a good bowl of chili on a cold fall day. A Home-made chili. I'm not taking about that hot red or green chili but this is a spicy stew. A dish that is enjoyed in many homes in America today and in many different ways.  

Chili used in other dishes :

  • Chili dog  - a topping over a hot dog
  • Chili Burger - burger topped with chili (usually without beans)
  • Chili Cheese Fries - added to fries and cheese
  • Chili Rice - chili served over white rice
  • Chili Mac - addition of macaroni or some other pasta
  • Frito pie - Frito corn chips with chili poured over the top.
  • Chili stuffed baked potato - stuffed chili with cheddar cheese, butter and chopped onions or green onions

I found this delicious recipe in Allrecipes. As mentioned by Ms Deb, " This is the tastiest, easiest chili recipe you'll ever find.". She's right about that. :)

Ingredients: Serves 8
2 pounds ground beef
1/2 onion, chopped
1 tsp ground black pepper
1/2 tsp garlic salt
2 1/2 cups tomato sauce
1 (8 oz.) jar salsa
4 tbsp chili seasoning mix
1 (15 ounce) can chili beans, drained (the recipe called for kidney beans, I don't like kidney beans so I used chili beans)

In a large saucepan over medium heat, combine the ground beef and the onion ans saute for 10 minutes, or until meat is browned and onion is tender. Drain grease, if desired.
Add the rest of the ingredients. Mix well, reduce heat to low and simmer for at least 1 hour. 
Serve warm with a toast or crackers.


Original recipe can be found here.

Saturday, September 24, 2011

Pan-fried Lamb Loin Chops


Lamb loin chops are super easy and quick to cook. They may be small in size, but the flavor is larger than life. The bone certainly adds flavor in the cooking process.


Ingredients:
8 lamb loin chops
1/4 cup olive oil
1 tbsp fresh thyme - chopped (used dried thyme)
1 tbsp fresh basil - chopped (used dried basil)
2 tsp fresh rosemary - chopped (used dried basil)
2 cloves garlic, minced
zest of 1 lemon
1 tsp salt
1/4 tsp black pepper

Combine everything in a bowl. Dip lamb chop into mixture to coat evenly. Cover chop and refrigerate 30 minutes. Heat up cast iron on medium heat and put a little olive oil on the bottom. When pan is hot, lay lamb chop in the pan and let them sear for 4-5 minutes. Once the side of the lamb chops has been seared, flip over. Make sure most of the seared part is brownish. Put the lamb chops under the hot broiler for 5 mins. Remove the chops from the broiler and let them rest in the pan, covered, for 10 minutes.


Useful link:
How to cook meat.

Wednesday, March 23, 2011

Garlic Shrimp with Pasta

The days are slightly warmer now. I could hear the birds chirping away in the morning. Many flowering plants are starting to bloom. But one thing I do not like about springtime is the unstable weather. Its that time of the year again, tornado season. :( 
Anyway yesterday, as I flipped through the latest issue of the Woman's Day magazine, I saw this recipe. It was quick, easy and tasted so good. I love the lemony taste. Next time, I'm gonna use the angel pasta. :)


Garlic Shrimp with Pasta (Garlic Shrimp with Angel Hair)
Ingredients:
12 oz angel hair pasta (used spaghetti)
1/2 Tbsp butter
2 tbsp olive oil
2 cloves garlic, finely chopped
1 lb peeled, deveined large shrimp, thawed if frozen (cut into smaller pieces)
1 Tbsp grated lemon zest
1/4 tsp crushed red pepper
Kosher salt
1/4 cup fresh lemon juice
1/2 cup fresh flat-leaf parsley, chopped

Directions:
Cook the pasta according to package directions. Reserve 1 cup of the pasta water. Drain the pasta and return it to the pot.
Meanwhile, heat 2 Tbsp of the butter and the oil in a large skillet over medium heat. Add the garlic and cook, stirring until fragrant, about 1 minute.
Add shrimp, lemon zest, crushed red pepper, and 1/2 tsp salt and cook, stirring occasionally, until the shrimp are opaque throughout, 3 to 5 minutes; stir in the lemon juice
Toss the pasta with the parsley, remaining 1/2 Tbsp butter and 1/2 cup of the reserved pasta water (adding more if the pasta seems dry). Serve with lemon wedges, if desired.

Source: womansday.com

Thursday, December 30, 2010

Deviled Eggs


The first time I had deviled eggs were at this year Thanksgiving's gathering. My friend made some and they were delicious. Here's a recipe with a lovely blend of sweet and spicy. They are easy to make and wont take too much of your time in the kitchen. Hubby prefer the ones with the sweet pickle relish which adds a bit of sweet crunch and I had to agree.  I do not have the deviled eggs tray so I just served them on my grape plate. :))


Ingredients:
6 hard-cooked eggs, peeled and cut lengthwise
3 tbsp Light Mayonnaise or Salad Dressing
1½ tbsp finely chopped onion 
2 tbsp sweet pickle relish
1 tbsp prepared horseradish  
1 tsp Dijon mustard
1/8 tsp salt
¼ tsp ground black pepper
Paprika for garnish

Remove the egg yolks to a small bowl and mash with a fork. Add the mayonnaise, onion, relish, horseradish, Dijon mustard, salt and pepper and mix thoroughly. Fill the empty egg white shells with the mixture and sprinkle lightly with paprika.
Cover lightly with plastic wrap and refrigerate for up to one day before serving.
Monday, November 29, 2010

Roast Turkey at home!

My first Roasted Turkey. I was worried at first that something could go wrong. I do not have the rectangular shallow roasting pan with the cooling rack so the bottom of my turkey was not browned. Nevertheless, when the turkey was done, I can't believe that I did a great job! The turkey was moist and tender. I asked my friend how she cooked her roasted turkey. She verbally informed me on the details. I also read on blogs about roasted turkey. I wrote down many recipes. I like the one especially with mixed herbs.. yumyum!! But when its time to cook the turkey, I cant decide which recipe I want to use so I just come up with it. :)

We thought the turkey was 15 lbs but it was actually 21 lbs. Just the two of us with a big bird!! Plenty of leftovers.. LoL!! No wonder it was really heavy so hubby helped me. I used the cold-water thaw method instead of refrigerated thaw. NEVER thaw a turkey at a room temperature, as this allows for bacterial growth. Rinse turkey under cool running water, rubbing all surfaces inside and out, to wash away bacteria. Remember any surface that comes in contact with raw poultry, must be washed with hot soapy water. Bacteria transfers easily from one surface to the next and can results in illness.

How long to thaw your turkey:

Turkey thawing time in cold water. 
Approximately 30 minutes per pound
Change water every 1/2 hour.

Whole Turkey Weight          Thawing Time
  8 - 12 lbs                                  4 - 6 hours
12 - 16 lbs                                  6 - 8 hours
16 - 20 lbs                                  8 - 10 hours
20 - 24 lbs                                  10 - 12 hours

Turkey thawing time in the refrigerator (40 degrees F)
Approximately 24 hours per 5 pounds

Whole Turkey Weight           Thawing Time
  8 - 12 lbs                                  1 - 2 day
12 - 16 lbs                                  2 - 3 days
16 - 20 lbs                                  3 - 4 days
20 - 24 lbs                                  4 - 5 days

Check Butterball website for tips and how to.

Personally I prefer not to cook stuffing inside the turkey. I think it takes a longer time, and they will get gooey. I like the crunch of baked dressings, that is why I baked separately. After cleaning the inside of the turkey, I lathered the inside with lemon juice and rub all over with a small handful of salt. For flavor, I used chopped carrots, celery, onions, cilantro and dried thyme to put inside the turkey, then covered with aluminium foil so that the vegetables won't fall out easily while baking. Before placing the turkey into the pan, I rubbed melted butter all over the skin and added  turkey broth into the pan (I think I added too much). Preheated the oven at 500 degrees F. When it's ready to put the turkey in the oven, covered with heavy-duty aluminium foil, I reduced to 350 degrees F. Then I reduced again to 325 degrees F, uncovered. I basted the turkey with the juices about three to four times. Finally, after several hours, I inserted the meat thermometer at the deepest part of the turkey and the temperature reading was around 180 - 190 degrees F. The turkey is ready, browned on top and smells good!! I let the turkey rest for about 15 to 20 minutes before hubby carved the turkey. :))


Sunday, November 28, 2010

Green Bean Casserole - Thanksgiving Side Dish

Green bean casserole is one of the side dish which is often served on Thanksgiving day. It is a casserole consisting of green beans, cream of mushroom soup and French fried onions. A comfort food that can be served any day and it is easy to make.

Ingredients:
1 tbsp butter or olive oil
5-ounces fresh white mushrooms, brushed clean, trimmed, and sliced
1/2 cup diced onions (optional)
1 pound fresh green beans, blanched
1 can (10-ounces) undiluted condensed cream of mushroom soup
1/2 cup heavy cream/ half-and-half or milk
1/4 cup chicken broth
2 tsp Worcestershire sauce
1 can (2.8-ounces) French-fried onions, divided
pinch of garlic powder
freshly ground black pepper to taste
kosher salt to taste

Preheat oven at 350 degrees F.
Place a heavy skillet over medium high heat. When pan is hot, add butter. When the butter has melted, add mushrooms and diced onions. Sprinkle lightly with salt. Saute mushrooms until they release their liquid and mushrooms begin to soften, Transfer to a large bowl.
Add green beans, cream of mushroom soup, heavy cream, chicken broth, Worcestershire sauce, half of fried onions, garlic powder and pepper, and salt to taste. Stir well. 
Pour green bean mixture into a 1-1/2 quart casserole dish. Bake uncovered for 30 minutes. Remove from the oven and top with the cheddar and the remaining half can of fried onions. Bake an additional 5-10 minutes until cheese has melted and onion topping is browned and crispy.

Wednesday, November 24, 2010

Oven Fried Chicken


My mum loves fried chicken and so do I. Especially those crispy ones. hmm.. yum-yum.. But I don't quite like them being deep-fried, too greasy. I hate to use napkins to wipe off some of the grease. Believe me, before when I ate fried chicken, I got into the habit of wiping off the grease before putting it into my mouth.. haha... 
I was delighted when I found out about oven fried chicken. Crispy and delicious, oven fried chicken is much healthier than any traditional fried chicken. You can eat these oven fried chicken by itself or make it into a sandwich.

With the mini buns that I made yesterday, we had chicken sandwiches. I sauteed onions and mushroom to go on top of the chicken.  Delicious oven fried chicken sandwich with sauteed onions and mushrooms... ohh don't forget the cheese.. hehe.. :)

Oven Fried Chicken 
(adapted from Food Network)

Ingredients:
1 1/3 cup cornflakes
1 cup toasted white bread
1 tbsp virgin oil
1 tsp kosher salt
1/2 tsp paprika
1/2 tsp freshly ground black pepper
1/2 cup mayonnaise
1 tsp ground mustard
4 skinless chicken pieces (about 6 ounces each) 

*(I used skinless chicken breast and cut into half)

Preheat the oven to 400 degrees F. Set a rack on a foil lined baking sheet. Spray the rack generously with cooking spray. Finely grind the cereal and toast together in a food processor. Transfer the crumbs to a large gallon size plastic bag. Add the oil, salt, paprika, and ground pepper and toss to mix thoroughly. Whisk the mayonnaise and mustard together in a medium shallow bowl. Add chicken to mayonnaise mix and turn to coat all the pieces evenly. Drop the chicken into the plastic bag, seal and shake until each piece is evenly coated. Drizzle some virgin oil, and bake for about 30-40 minutes or until the coating crisps and browns. Transfer to a platter and serve hot or at room temperature.


**P.S: Remember, I said I will post about the Eid-ul Adha food, well I'm very sorry I did not post anything on that. Last minute, I did not cook anything special. We just had Sambal Tumis Ayam and Kentang (Spicy Chicken and Potato Chilli based Sauce) with white rice. :)

Friday, March 19, 2010

Classic corned beef and cabbage, carrots and potatoes....


When hubs came home, I saw plastic bags at the front door. He went to the supermarket (..without me...) after work. He said we are having corned beef tonight. I wasn't planning on having corned beef tonight but since he said it, I just agreed. Hubs is part Irish and he said this traditional Irish dish that is normally served on St. Patrick's Day and it is delicious.  (we had a belated St. Patrick's Day food... Lol...) As you know, what he likes may not be what I like so I was like okay, I give it a try... I suggested that he'll do the cooking tonight while I clean up the other room. Then the smell of corned beef and cabbage coming from the kitchen was fantastic but it's like taking forever to cook. By the time, it was done, I was so hungry. Well,  it was not bad as I thought it would be. It's lovely to have one dish associated with a day.. Kudos to hubs. Thumbs up!!! Love ya!

Ingredients:

3 pounds corned beef brisket with spice packet
10 small potatoes
5 carrots, peeled
1 large head cabbage, cut into wedges

Place corned beef in large pot or Dutch oven and cover with water. Add the spice packet that came with the corned beef. Cover pot and bring to a boil, then reduce to a simmer. Simmer approximately 50 minutes per pound or until tender.

Add whole potatoes and carrots, and cook until the vegetables are almost tender. Add cabbage and cook for 15 more minutes. Remove meat and let rest 15 minutes. 

Place vegetables in a bowl and cover. Add as much broth (cooking liquid reserved in the Dutch oven or large pot) as you want. Slice meat across the grain.  


 Enjoy and have a great weekend all. ♥♥

Monday, February 15, 2010

♥♥♥ Happy Chinese New Year and Happy Valentine's Day 2010 ♥♥♥

I meant to post this yesterday but I was not able to.... Well its better a little late than never.. hehe.. Whether you are celebrating The Chinese New Year, Valentine's day or just spending lazy Sunday, I hope you enjoyed it! We enjoyed ours, just spending time together and eating nice home cooked food. I woke up early to prepare breakfast to serve hubby while he is still in bed. I don't like to serve food in bed but once in a while I guess its ok.. For lunch, simple sandwich.. Then around 4.30pm, I started to prepare for dinner.. 

Puff Dutch Nilla Pancake by Kraft


Ingredients
3 eggs
3/4 cup  milk
20 NILLA Wafers, finely crushed
8   strawberries, sliced
1 medium banana, sliced (I didnt use)
1 tsp.  powdered sugar 

PREHEAT oven to 450°F. Beat eggs and milk in medium bowl with wire whisk until well blended. Stir in crushed wafers. 

WRAP handle of large ovenproof skillet with several layers of foil (I used my cast iron so no need to use foil). Heat on high heat 2 min. Spray with cooking spray. Add egg mixture; place in oven. 

BAKE 14 to 16 min. or until egg mixture is puffed and golden brown. Remove from oven; top with the fruit. Sprinkle with powdered sugar. Cut into four wedges. Serve immediately. Store any leftover pancake in refrigerator. 


The prepared tray to be serve to hubby in bed. Oooo-lala.. *wink~wink* 


Our Dinner, I cooked rib-eye steak with balsamic and cranberry juice glaze. I think it was not too impressive. Next time, I should cook it a little longer so the meat would have absorbed the balsamic and cranberry juice. :( But the salad, it was AMAZING!!! I made Spinach and Strawberry Salad. I love this salad, its my favorite. At first hubby thought it would not be any good but after he take the first bite, he liked it.. Some onion rings and spring roll as a side dish. For dessert..... Chocolate coated Strawberries!!! Yummy!!!!!!


That is our Valentine's Day menu.. Hope you enjoy yours... ♥♥♥

Friday, February 12, 2010

Chicken Scrampi II

I thought today was the 13th and tomorrow is Valentine's Day. No special plans since it's just another day. From my  point of view, if we go out to eat at a restaurant, it could cost little more  (just like any other special occasion) and flowers could cost twice the price because so many people want to get flowers for their love ones.. I told my hubby no need to go out and no need buy flowers... I planned to cook something special..  hehe.. I planned to start with breakfast in bed,  skip lunch then dinner and last but not least the dessert.. So we went to the supermarket to get some of the items that I need..  When we got home, I overlooked one item from my list. So I asked my hubby, if he could go to the store tomorrow to get it for me so that I prepare for  special dinner tomorrow. He said "Why tomorrow??? Its 13th"  Then I insisted that tomorrow is the 14th... He showed me the calender... hahaha... I got confused with the dates again.. But I felt relief though because I still have another day to prepare my last minute DIY Valentine's card for him.. Lol!!

For us, this week is all about pasta. On Monday, we had Spaghetti Alfredo, Wednesday was Spaghetti in Tomato sauce (ground beef and mushroom) and today, its Vermicelli Chicken Scrampi II.  I saw the chicken scrampi recipe at Allrecipes and thought chicken scrampi would be nice with pasta. After carefully read through a great amount of reviews and I followed some good suggestions...

Chicken Scrampi II (Allrecipes)

Ingredients:
1/4 cup butter
2 tbsp olive oil
1 tsp dried parsley
1 tsp dried basil
1/4 tsp dried oregano
4 cloves garlic, thinly sliced
salt to taste
2 tbsp lemon juice
4 boneless chicken breast halves, cut into cubes
Green pepper, diced (optional) 
Parmesan cheese (optional)
Shredded cheese (optional)

In a skillet heat the butter and oil over medium high until the butter melts. Add the parsley, basil, oregano and garlic and salt and mix together in the skillet. Stir in lemon juice.

Then add the chicken and saute for about 3 minutes or until white. Lower the heat and cook for about 10 to 15 minutes or until chicken is cooked through and the juices run clear. More butter can be added if needed. 

Notes: 

I boiled 7 oz vermicelli pasta, drained. Then mixed with chicken scrampi and also the Parmesan cheese at the last minute before removing from the heat. 
  

Saturday, January 23, 2010

Steak with Sauteed Mushrooms and onion


Tonight's dinner was simple steak with sauteed mushrooms and onion. I also whipped up mashed potatoes with turkey bacon and mixed broccoli and carrots as a side dish. I did not make any gravy or sauce because there will be some juice from the steak.. *wink*.. Dinner was sooo yummylicious! We both enjoyed it very much. :)

It has been raining a lot these days here. Last Thursday, was the worst of all. Lotsa rain with loud thunderstorms... and I was all by myself while hubby at work.. :( I was a little scared, afraid if we would be get any tornado or something. That is very scary... Also for the first time, in my life, I saw hail. It was interesting to see small pellets of ice falling from the sky (pic at my front door)..

Hope everyone have a nice weekend. :)

Ingredients:
2 tbsp + 1 tbsp butter
1 tbsp Olive oil
1 large sweet onion, sliced
1 box fresh mushrooms, clean and sliced
Salt and pepper to taste
1/4 cup balsamic vinegar
2 beef tenderloin steaks (1 1/2-inch thick)
meat tenderizer

Season steaks on both sides with meat tenderizer. Chill for 30 minutes in the refrigerator.
In large skillet, heat butter until bubbly. Saute onion, mushrooms, salt, and pepper for 2 minutes. Add balsamic vinegar and continue to saute until mushrooms are tender. Set aside; cover. (There would be plenty, serve it as a side-dish, that's what I did)
Wipe out skillet. Heat butter and olive oil on the skillet over medium high heat. Add steaks to skillet. Sear the steaks, moving them with tongs a little so they don't stick to the bottom, for 5-6 minutes per side. Use a meat thermometer to test for doneness. When the steaks are done to your liking, remove from the pan, cover loosely with aluminum foil and let rest 5 to 10 minutes before serving.

On a serving plate, place the steak and topped with sauteed mushrooms and onions. Enjoy!
Notes:

Always let your steaks come to room temperature (70°F) before cooking or grilling. If your room's temperature differs from 70°F, adjust your time accordingly. A cold steak will contract when it hits the heat and this wall cause it to toughen.

A guide for the done-ness of your steak :-
  • Very Rare : 130°F, red almost translucent center and cool
  • Rare: 140°F (60°C), center of the steak is very red and cool
  • Medium Rare: 150°F (65°C), center of the steak is red and warm
  • Medium: 160°F (71°C), center of the steak is pink and hot
  • Medium Well: 165°F (74°C), center of the steak is pinkish and hot
  • Well done: 170+°F (77+°C), steak is thoroughly cooked

Tuesday, January 19, 2010

Spicy Skillet Chicken


My heart goes out to Haiti. Almost a week after the earthquake, let's pray and hope the rescuers are able to find more survivors...

Tonight, I was able to make a quick delicious dinner within 45mins. I saw this recipe in my email. It looked so delicious so I decided to give it a try. I  had to make a few changes to the ingredients since some of the items are not available in my kitchen. I was super hungry after cooking, and totally forgot to cut the chicken breast into slices like I intended to do before taking a photo... so here is how my spicy skillet chicken on a bed of rice look like...  :)


Spicy Skillet Chicken (adapted from Betty Crocker recipes)
(Serves 4)
Ingredients:
1 to 2 tsp chili powder
1/2 tsp salt
1/4 tsp black pepper
4 boneless skinless chicken breasts
1 tsp vegetable oil
1 tomato, chopped
1/2 green pepper, chopped
1 can (11oz) whole kernel corn, drained
1/3 cup taco sauce
2 cups cooked white rice
  1. Mix chili powder, salt and pepper in a small bowl; sprinkle evenly over both sides of chicken breasts. In a nonstick skillet, heat oil over medium heat. Place the chicken on the skillet; cook 8-10 minutes, turning once, until juice of chicken is clear when center of thickest part is cut (170°F).
  2. Stir in corn, tomato, green peppers and taco sauce. Heat to boiling. Reduce heat. Cover and simmer 3 to 5 minutes or until vegetables are hot. Serve over a bed of rice. 

Thursday, December 03, 2009

Layered Mac & Cheese Taco


A lot of people like to eat Macaroni & Cheese.  At the store, they  sell mac & cheese in a box, easy, does not require too many ingredients and its fast. Cook it over the stove or just microwave; even faster. I have one box of mac & cheese left in the pantry and I thought what should I do with this mac & cheese. My hubby prefers his way of making mac & cheese, and I prefers mine... I have to think of something so that both will really enjoy... :)

So, I prepared the mac & cheese as indicated in the box. Then I prepared the taco meat as indicated in the taco seasoning mix package. (Click here). I added 1/2 cup sour cream in the prepared mac & cheese dinner. and spoon about 1/2 of the dinner mixture into 8-inch square baking dish. Spread the meat mixture and shredded cheddar cheese. Repeat for another layer; cover with foil. Bake for 15 minute. Then top with chopped tomatoes and shredded cabbage (or you can use salsa) and spread more shredded cheese and bake again for another 5 mins uncovered.

Serve with toasted tortillas or tortillas chips. Yummy!!! :)

Monday, October 12, 2009

Beef Stroganoff

This is one of the most famous fast meat dishes, consisting of tender strips of steak in a tangy sour cream sauce. I've made some changes and added my own substitutions.

Served with homemade french fries and noodles.


Beef Stroganoff
the best ever 20 Minute Cookbook, Jenni Fleetwood

Ingredients:
450g/1 lb fillet steak or rump steak, trimmed and tenderized with a rolling pin or meat mallet
15ml/1 tbsp sunflower or vegetables oil
25g / 2 tbsp butter
1 onion, sliced
15ml/1 tbsp plain flour
5ml/1 tbsp tomato paste ketchup
5ml/1 tbsp Dijon mustard Wasabi
5ml/1 tbsp lemon juice
150ml/ 1/4 pint/ 2/3 cup sour cream
salt and black pepper
fresh herbs, to garnish

Using a sharp cook's knife, cut the tenderized steak into thin strips, about, 5cm/2in long. Heat the oil and half of the butter in a frying pan and fry the beef over high heat for 2 minutes, or until browned. Remove with a slotted spoon, leaving any juice behind.

Melt the remaining butter in the same pan and gently fry the onion for 8 minutes, until soft. Stir in the flour, tomato paste, mustard, lemon juice and sour cream. Return the beef to the pan and stir until the sauce is bubbling. Season well and garnish with fresh herbs.

Monday, August 10, 2009

Taco meat fillings in Crepes

Tonight's dinner was fast and simple. We wanted to have Mexican food but do not have any Taco shells or Tortillas. In order to replace Taco shells, I made Crepes. French and Mexican combined. Simple and delicious. :)

It is very easy to make the taco meat fillings. I just used the Taco seasoning mix that can easily get at the store. Follow the instructions at the back of the packet. For my crepes, I followed the recipe from my recipe book. I love to eat crepes.. especially as desserts. All that chocolate sauce, ice-cream or even with Nutella.. oh my.. i wish i have some Nutella right now.. lol!! Anyway, it was a good dinner for the two of us. :)

Taco meat filling
1 package of Taco Seasoning Mix
2/3 cup water
1 pound ground beef

In a small saucepan, brown and crumble ground beef. Drain fat. Wipe out the excess fat in the saucepan with paper towels. Stir in Taco seasoning mix and water. Cook and stir for 2-4 minutes.

Crepes
2 cups all-purpose flour
3 eggs, lightly beaten
1 cup milk
3/4 cup water
2-1/4 cups butter melted
pinch of salt

Combined eggs, milk and water. Sift the flour and salt into a large bowl. Make a well in the center and add the combined mixture. With a whisk gradually drawn in the flour and whisk to a smooth batter. Stir in the melted butter. Pour into a jug and set aside for 30 minutes.
Heat a 8-inch non-stick frying pan and grease lightly. When the pan is hot, pour in about 1/4 cup of the mixture and tilt the pan to cover. Tip out any excess batter. When the edges begin to curl, gently turn the pancake over with a spatula. Cook until lightly browned on both sides and slide onto a plate. Serve immediately.

Top with diced tomatoes, lettuce, cheese, sour cream.. hmm.. yummy!

Tuesday, July 28, 2009

Leftovers - Lemon pepper chicken and my hard boiled egg....

This chicken and egg mayo is so good. We bought a rotisserie lemon pepper chicken yesterday and had plenty of leftovers. I felt bad to throw away the leftovers. I shredded the meat so I can make chicken mayo. The chicken mayo reminds me when I was back home, every time, I go to Subway, I always ordered tuna mayo with plenty of salad, tomatoes, black olives and green peppers with honey mustard and sweet onion sauce. **yummy** hmm.. could have done the tuna mayo too.. lol..

After I shredded the chicken, I decided to add one hard boiled egg. Its funny about hard boiled egg.. I do not even know when the egg becomes a hard boiled egg. haha.. coz seriously, i don't usually eat hard boiled eggs. Even when I do, its was not me who boiled those eggs... hahha.. Anyway, as I was preparing, my significant half came back home for lunch. I didn't realized the time. I was still boiling the egg and I was like"gosh, you are home, my egg is not hard yet".. So I thought maybe its hard, I had to pick up the egg with a spoon and crack the egg open... it was still soft and so I had to dump it back into the hot water again and let it in there for another few minutes...

Once the egg became hard-boiled, I peeled and mashed it, chopped parsley and cilantro and mix with mayonnaise. Sprinkle salt and pepper to taste. Spread on the slices french bread and there you have... Chicken and egg mayo sandwich.. yummy...

(Sorry these are not good pictures.. )

(I always like to put extra black pepper)

You'll need:
shredded chicken (leftovers)
hard-boiled egg - mashed
green onions - chopped
cilantro - chopped
mayonnaise
salt and pepper to taste

Mix all together.

Enjoy over slices of toasted bread. :)

Friday, February 13, 2009

Oatmeal Butter Prawns


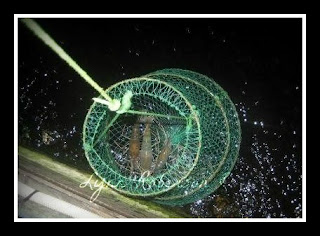
Fresh live prawns!! Yummy!!!! We went to a fishing pond to catch prawns... no fish but prawns... I forgot the name of the place but I remember the place is in a golf range. There is a seafood restaurant. The owner charged for 1 hr its $15, 2 hrs $25 and 3 hrs $30 and you get 1 fishing rod. So within the period you paid, you can catch as many prawns you like.. So let say, you pay for an hour, you might get 3 or 4 prawns or even more or less... Fishing need a lot of patience. I even saw some people, after they caught some prawns, they could bbq right there and eat them there... the smell of the bbq made me hungry... yummy!!

My cousin and his gurlfren were already there and by the time when we got there they already caught some (as in the picture below)

After 4 hrs of of prawning... hehe.... I would say we caught quite a lot. So as soon as we got home, mom we cleaned the prawns with salt and water then deep-fry the live prawns.

My mom wanted to make Sambal Prawns but its too spicy so I suggest to cook Oatmeal Butter Prawns.. This is my favorite dish and everyone else in the family too...:)

Cooking with mom, well, she doesnt use the measuring cup or scale... just using estimations.. So I had to look in my recipe book for Oatmeal Butter Prawns and do some adjustments...


Recipe:
  • 300g big prawns, trimmed, washed and drained
  • 3 tbsp butter / margarine
  • 3 egg yolks, beaten lightly
  • 2 tbsp garlic and onion paste
  • 1 tbsp curry powder
  • 1 tsp sugar
  • 2 sprigs curry leaves
  • 5 tbsp quick-cooking oatmeal
  • salt and pepper, to taste
  • Oil for deep-fry
  • Chinese parsley and spring onion - garnish (optional)
Method:
  1. Heat up oil, add prawns and deep-fry for 1 minute Dish and drain.
  2. Level 1/2 cup of oil wok, saute butter/margarine and egg yolks till fragrant.
  3. Add garlic, chicken stock granules, sugar, curry leaves, chillis, salt and peppeter and continue to fry till fragrant.
  4. Add prawns and fry till aromatic.
  5. Lastly, add oatmeal and fry till dry. Dish up and serve hot.


Enjoy! :-)
Related Posts Plugin for WordPress, Blogger...