Showing posts with label Japanese. Show all posts

Wednesday, March 21, 2012

Kawaii Panda Bread


This is a Japanese bread. It's called Kawaii Panda Bread... It looked so cute. I kept thinking about it ever since I saw the photo. Finally, I made it on last Thursday. It was quite a challenge, a lot of hard work and time consumed since it was my first time.

I found the recipe from Makansutra Blog Street!. Originally the recipe is from Taro Taro at www(.)cookpad(.)com. Thank you to Ms Lorriane Koh for the translation. Since I did not have green tea powder in hand, I substituted it with pandan essence. After all that hard work, I was very pleased with how my panda bread turned out. The bread taste really good but I feel I need to make it a little more lighter. Hubby said I did a great job and even suggested to create other animals' face... haha..

Spread butter over a slice of a warm fresh bread... ...Oooo... yummy! ;)

Ingredients:
For the dough
3 cups of all purpose flour
3 tbsp of sugar
1 cup of milk together with 1 egg yolk
¾ tbsp of salt
1 ½ tablespoon of butter
2 ½ tsp dry yeast

For the coloring of the Panda face
1 tbsp green tea powder mixed with 2 tsp hot water (I used pandan essence)
3 ½ tsp of Cocoa powder mixed with 1 ½ tsp of hot water

Method:
Warm the milk and egg mixture by placing it in the microwave for 30 seconds. Set aside.

Mix the flour, sugar, salt, butter and yeast together in a bowl.

Then add the milk and egg mixture. Mix together for about ten minutes. The dough should be soft but not sticky. Divide the dough into three portions – two about equal in size to each other, while the third should be sized about 1/3 of the other two. (Refer to image.)

Place one of the larger pieces in a bowl and add in the green tea. Mix together till the green is evenly spread out. Cover the green dough with cling wrap and set aside.

Take the smallest piece of dough and mix in the cocoa powder. Cover the brown dough with cling wrap and set aside. Do this for the white dough as well. Leave the dough pieces for about an hour (in a warm, covered surrounding) till they double in size.

Now it’s time to craft the panda face. Take the white dough and separate into three pieces – two about equal in size to each other, while the third should be sized about 1/3 of the other two (as you did earlier).
Take the brown dough piece and separate into four equal pieces.

Use one of the larger white pieces to form the face. Use two quarters of brown dough to form the eyes. Place the smallest white dough piece in the middle of the two brown “eyes”, to keep them in place. Flatten the other big white dough piece and wrap it around tightly. 

As for the other two brown dough pieces, roll them into “ears” and place them on top. Divide the green dough into two – the bigger piece is about 4 times the size of the smaller piece.Place the smaller green part in the middle of the ears. Flatten the bigger green part and wrap it tightly around your creation.
Place the whole piece into a lightly greased loaf pan, cover and let rise until doubled, for around 40 minutes.
Preheat the oven for half an hour at 400° F (200° C) in the meantime. Once the dough is doubled, place it in the oven for 30 minutes.

Monday, July 18, 2011

~~ Foodography ~~

In Singapore, it is so easy to get not only the local food but international food. I rarely cook at my parent's house because either my mum or grandmother does the cooking or I'll go dining out. So I've been thinking.. perhaps its a good idea to share photos of the food that I enjoyed eating while my long vacation here in Singapore. :))

ICHIBAN BOSHI 
23 Serangoon Central, #01-04, NEX Mall, Singapore

  Colorful plates with delicious delectables on sushi conveyor belt.

Buffet

Chawanmushi and Gunkan sushi

Fried Tofu


Wednesday, November 03, 2010

Sharing Sushi

Seriously, I was disappointed. Firstly, my sushi looks awful and secondly, hubby was sick and I ate by myself. To make and rolling sushi was not as easy as I thought. I need A LOT of practice.. and the nori (seaweed) that I bought, I think was not the right one and when I opened the packet, some were broken. :( I tried but I will try again.. or maybe just go to a sushi restaurant for some delicious sushi. Today's post comes with no recipe but just want to share the following with you.. :)

Different types of sushi and rolls:

Sliced raw fish by itself - Sashimi


Chirashi-sushi - A bowl or bento box filled with sushi rice topped with a variety of fish and vegetables. 


Nigiri-sushi - Consists of an oblong mound of sushi rice that the chef presses into a small rectangular box between the palms of the hands, usually with a bit of wasabi, and a topping draped over it. Generally the most common form of sushi you will see. 


Gunkan Nigiri - Gunkan means boat and this sushi gets the name from the way the main ingredient is held in place on top of the sushi rice. It is in a boat shape.


Inari-sushi - Aburage (fried pockets of tofu) stuffed with sushi rice. 


Maki-sushi - Seaweed filled with fish and/or vegetables rolled up with rice on the outside. There are also more specific terms for the rolls depending on the style. They are:


Chakin-sushi - rice on the inside wrapped in a thin egg crepe


Futomaki - thick, large or fat rolls


Hosomaki - thin rolls


Uramaki - inside-out rolls (rice on the inside)


Tazunamaki - (Rainbow Roll) Maki roll with strips of fish and/or avocado across the top.


Temaki-sushi - Also called a handroll. Rice, fish and vegetables wrapped in seaweed shaped as a cone. The handroll has the same ingredients as Maki, the only difference is in how it is wrapped.

Here are some dining etiquette:
* Do not rub your chopsticks together. If you have to, do it under the table so the chef can't see you! Doing so implies that the chef is cheap (I must remember this coz I did it before.. hehe). 
* It is generally considered best form to eat sushi in one bite.
* It is OK to eat nigiri-sushi with your hands. Sashimi is only to be eaten with your chopsticks.
* Do not ask your chef "Is that fish fresh?"  Of course it’s fresh or the chef should not be serving it.
* Gari (ginger) is considered a palate cleanser and eaten between bites or different types of sushi. It is not meant to be eaten in the same bite as a piece of sushi.
* Slurping noodles is OK, less so for soup, but a bit is fine, at least by Japanese standards. You are expected to pick up your bowl to drink the soup, using your chopsticks to direct the solid pieces to your mouth.
* Eat them all. Try to eat all the food that is ordered, as it is considered bad manners to waste food. 

If you want to try Japanese, ‘domo arigato’ for ‘thank you’ and if you want to be more sophisticated, you might try “gochisosama deshita,” for “thank you for the meal.” You can use the less commonly used "oishikatta desu" for "it was delicious".

Tuesday, November 02, 2010

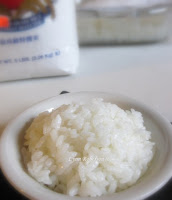
The Sushi Rice


Sushi rice is the most important ingredient in your sushi. The rice is a white, short-grain variety, which means the grains are very small and almost round. Short-grained rice contains a high percentage of starch when compared to other varieties, and this is why the grains are so sticky. While most rice loses its excess starch with a quick rinse under cold water, sushi rice will always remain sticky.

It is recommended to use a rice cooker.. hmmm.. NADA.. Do not worry!! Rice was always cooked with a pot before the rice cooker was invented.. so back to the old style... If you get some rice stuck on your pot, put water in it and soak about half and hour, and it will easily comes off.

Ingredients:
3 cups uncooked Japanese sushi rice
3 1/4 cups cold water
1/3 cup rice vinegar
2 tbsp sugar
1 tsp salt 

Wash rice in cold water until the water runs almost clear. This may take a few minutes. Once water runs semi-clear, drain rice of any excess water and add water. Bring the water and rice to a boil and cover with a lid. Once you put a lid on the pan reduce the heat and simmer for 20 minutes. After 20 minutes turn off the heat and leave covered for 10 minutes. **Do not to lift the lid during this last 10 minutes as the rice is still cooking even after the heat is off.

While the rice is cooking heat the rice vinegar, sugar and salt in a pan until dissolved. Remove from heat as soon as sugar and salt has dissolved.

How to make sushi rice with tools you already own...

Use a baking dish or Tupperware with a large flat surface so you can spread out the rice as much as possible. The only difference using the tools you already own is that you need to constantly fan the rice, since extra moisture will be evaporated when using a Pyrex or plastic material (make sure to use non-reactive material since vinegar is used). 

When the rice is ready, immediately transfer it to the baking dish while it is steaming hot. Drop the rice (upside down out of the pot) towards the center of the baking dish. While the rice is still clumped together, evenly pour the rice vinegar mixture over the rice by dripping it on the spatula. The vinegar will drain through the gaps between the rice. While cooling the rice with a fan, use the spatula and quickly flatten out the rice over the whole surface of the baking dish. Do not use too much force for it may smash or break the rice.
Keep cooling the rice with the fan and gently run the spatula through the rice in a grid pattern. This is to increase the surface area of the sushi rice to cool it faster and make it easier to flip in the next step. Give it a final cooling. Collect the rice to the other side while flipping in small amounts. Wet a paper towel and cover the rice. 


Now the sushi rice is ready to make some home-made sushi... :)

Friday, April 09, 2010

Tempura Batter -- Kakiage


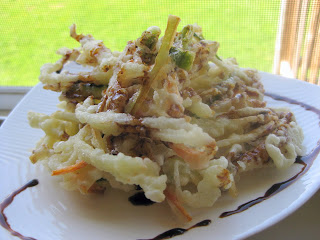
One of my favorite Japanese side dish is Kakiage. It is a type of tempura which is made with mixed vegetable strips. Besides having sushi at the  Japanese restaurants, it is like a must to order kakiage, fried tofu, soba noodles and potato croquette. So if you bring me to a Japanese restaurant, you'll know what I'll be ordering.. hehe...

Traditionally, tempura batter is mixed in small batches using chopsticks for only a few seconds. It is important to use only cold water and leave the batter lumpy. This will result in the unique fluffy and crisp tempura structure when cooked. The first time, I had over mixed the batter, and the results were disappointing. Here, besides using the vegetables, I also used firm tofu. They were simply yummilious!!!! Now I know how to make my own tempura batter. I do not miss my favorite side dishes at the Japanese restaurant anymore... I still have to work on my sushi.. hehe.... 

Tempura Batter
Ingredients:
1 egg
1 cup iced water
1 cup all purpose flour
pinch of salt

I used potatoes, carrots, zucchini, green peppers and onions (cut into strips) for my Kakiage. You may like to use mushrooms, shrimps or scallops too.

Beat an egg in a large bowl. Add ice water in the bowl. (I added the ice into the batter to make it cold) Add flour and salt in the bowl and mix lightly.Do not over mix. (its okay to leave lumps in the batter).

Heat oil to 340 degrees F in a deep pan. Add the mixed vegetables strips in the tempura batter, and mix together. (if you have ice in the batter, remember not to scoop the ice to the oil)

Take a scoop of the mixture with a large spoon and slip into the oil. Shape the piece, using chopsticks or a cooking tong until firm. Deep-fry until browned on both sides. Drain and serve immediately.


Here, I serve with black sweet sauce. Yum-yum!!!

Notes:
  • Use only cold ice water.
  • Over-mixing the batter will result in activation of wheat gluten, which causes the flour mixture to become chewy and dough-like when fried.
  • If the batter becomes warm while you are deep-frying, add ice to the batter, or by placing the bowl inside a larger bowl with ice in it.

Have a good weekend. :)
Related Posts Plugin for WordPress, Blogger...