Monday, November 29, 2010

Roast Turkey at home!

My first Roasted Turkey. I was worried at first that something could go wrong. I do not have the rectangular shallow roasting pan with the cooling rack so the bottom of my turkey was not browned. Nevertheless, when the turkey was done, I can't believe that I did a great job! The turkey was moist and tender. I asked my friend how she cooked her roasted turkey. She verbally informed me on the details. I also read on blogs about roasted turkey. I wrote down many recipes. I like the one especially with mixed herbs.. yumyum!! But when its time to cook the turkey, I cant decide which recipe I want to use so I just come up with it. :)

We thought the turkey was 15 lbs but it was actually 21 lbs. Just the two of us with a big bird!! Plenty of leftovers.. LoL!! No wonder it was really heavy so hubby helped me. I used the cold-water thaw method instead of refrigerated thaw. NEVER thaw a turkey at a room temperature, as this allows for bacterial growth. Rinse turkey under cool running water, rubbing all surfaces inside and out, to wash away bacteria. Remember any surface that comes in contact with raw poultry, must be washed with hot soapy water. Bacteria transfers easily from one surface to the next and can results in illness.

How long to thaw your turkey:

Turkey thawing time in cold water. 
Approximately 30 minutes per pound
Change water every 1/2 hour.

Whole Turkey Weight          Thawing Time
  8 - 12 lbs                                  4 - 6 hours
12 - 16 lbs                                  6 - 8 hours
16 - 20 lbs                                  8 - 10 hours
20 - 24 lbs                                  10 - 12 hours

Turkey thawing time in the refrigerator (40 degrees F)
Approximately 24 hours per 5 pounds

Whole Turkey Weight           Thawing Time
  8 - 12 lbs                                  1 - 2 day
12 - 16 lbs                                  2 - 3 days
16 - 20 lbs                                  3 - 4 days
20 - 24 lbs                                  4 - 5 days

Check Butterball website for tips and how to.

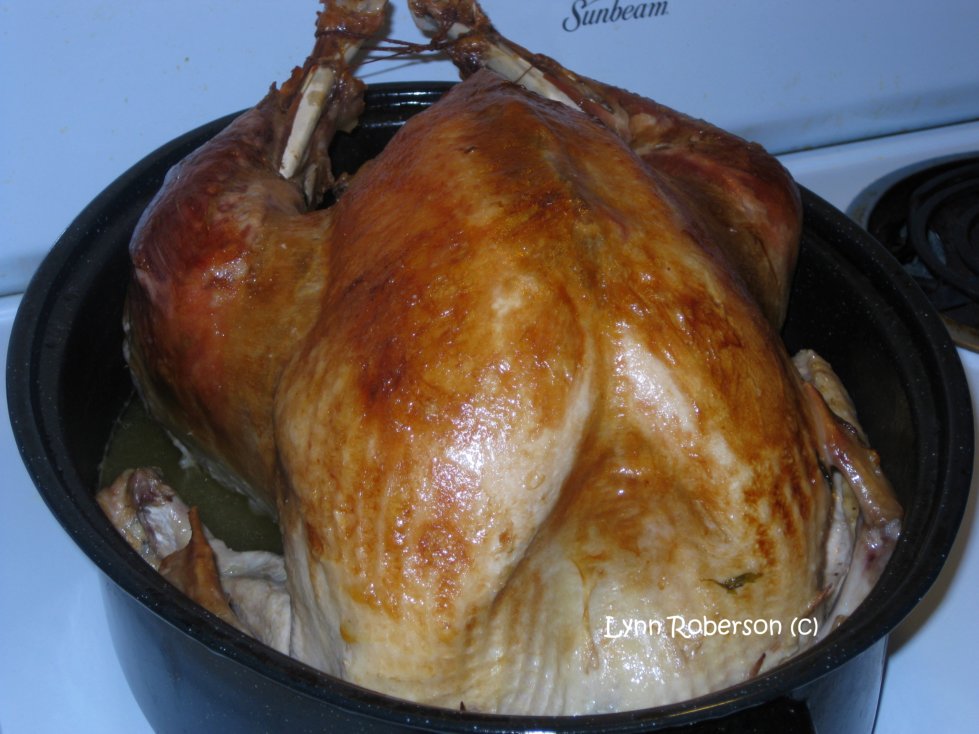
Personally I prefer not to cook stuffing inside the turkey. I think it takes a longer time, and they will get gooey. I like the crunch of baked dressings, that is why I baked separately. After cleaning the inside of the turkey, I lathered the inside with lemon juice and rub all over with a small handful of salt. For flavor, I used chopped carrots, celery, onions, cilantro and dried thyme to put inside the turkey, then covered with aluminium foil so that the vegetables won't fall out easily while baking. Before placing the turkey into the pan, I rubbed melted butter all over the skin and added  turkey broth into the pan (I think I added too much). Preheated the oven at 500 degrees F. When it's ready to put the turkey in the oven, covered with heavy-duty aluminium foil, I reduced to 350 degrees F. Then I reduced again to 325 degrees F, uncovered. I basted the turkey with the juices about three to four times. Finally, after several hours, I inserted the meat thermometer at the deepest part of the turkey and the temperature reading was around 180 - 190 degrees F. The turkey is ready, browned on top and smells good!! I let the turkey rest for about 15 to 20 minutes before hubby carved the turkey. :))


Sunday, November 28, 2010

Green Bean Casserole - Thanksgiving Side Dish

Green bean casserole is one of the side dish which is often served on Thanksgiving day. It is a casserole consisting of green beans, cream of mushroom soup and French fried onions. A comfort food that can be served any day and it is easy to make.

Ingredients:
1 tbsp butter or olive oil
5-ounces fresh white mushrooms, brushed clean, trimmed, and sliced
1/2 cup diced onions (optional)
1 pound fresh green beans, blanched
1 can (10-ounces) undiluted condensed cream of mushroom soup
1/2 cup heavy cream/ half-and-half or milk
1/4 cup chicken broth
2 tsp Worcestershire sauce
1 can (2.8-ounces) French-fried onions, divided
pinch of garlic powder
freshly ground black pepper to taste
kosher salt to taste

Preheat oven at 350 degrees F.
Place a heavy skillet over medium high heat. When pan is hot, add butter. When the butter has melted, add mushrooms and diced onions. Sprinkle lightly with salt. Saute mushrooms until they release their liquid and mushrooms begin to soften, Transfer to a large bowl.
Add green beans, cream of mushroom soup, heavy cream, chicken broth, Worcestershire sauce, half of fried onions, garlic powder and pepper, and salt to taste. Stir well. 
Pour green bean mixture into a 1-1/2 quart casserole dish. Bake uncovered for 30 minutes. Remove from the oven and top with the cheddar and the remaining half can of fried onions. Bake an additional 5-10 minutes until cheese has melted and onion topping is browned and crispy.

Thursday, November 25, 2010

Gina's Pumpkin Cheesecake - Thanksgiving Dessert

Happy Thanksgiving everyone!!! For the next few days, I am posting about some of Thanksgiving dishes. To begin my first post, it will be on Dessert. I baked my first pumpkin cheesecake. At first, I was a little skeptical with the amount of cream cheese used for this recipe. I thought it would be heavy but not at all. The gingersnap cookies really goes well with pumpkin and the cinnamon whipped cream topping, that, is really a great touch!! Great recipe!

Thanks Gina for this fabulous recipe.  :)


Gina's Pumpkin Cheesecake, Food Network


Ingredients:
Crust:
30-35 squares gingersnap cookies
6 tbsp (3/4 stick) unsalted butter, melted

Preheat the oven to 350 degrees F.
Add the gingersnaps to the bowl of a food processor, and pulse until crumbly. Transfer to a large bowl and add the melted butter. Stir until evenly mixed. Press the mixture into the bottom of a 9-inch spring-form pan with 3-inch sides. Bake the crust until golden brown, about 10 minutes. Remove from the oven and let cool completely while preparing the filling.
Fillings:
4 (8-ounce) packages cream cheese, room temperature
1 3/4 cups sugar
1 (15-ounce) can puree pumpkin (not pumpkin mix)
5 large eggs
1/2 tsp ground ginger
1/4 tsp freshly grated nutmeg
1/4 ground cloves
1/2 tsp table salt
1 tbsp vanilla extract
2 tbsp all-purpose flour

Put a teakettle filled with water on the stove top, over medium heat, and bring to a boil.
In a large mixing bowl, add the cream cheese and sugar and beat with an electric mixer at a low speed until light and fluffy, about 2 to 3 minutes. Add the pumpkin and beat until incorporated. Beat in the eggs, one at a time, then add cinnamon, ginger, nutmeg, cloves, salt and vanilla, and beat until blended. Add flour and beat until incorporated.
Wrap the sides and bottom of the 9-inch spring-form pan with heavy-duty aluminum foil. Pour filling into the pan and put it in a small roasting pan. Pour the hot water from the teakettle into the roasting pan, filling halfway up the sides of the spring-form pan, about 1 1/2 inches. Bake at preheated oven at 350 degrees F until the center of the cheesecake moves slightly when the pan is gently shaken, about 1 hour and 20 minutes. Remove the cake from the water bath and let it cool on a wire rack. Once cooled, use a paring knife to loosen the sides of the cake from the pan. Chill the cheesecake for at least 4 hours before serving. Serve with Cinnamon Whipped Cream.

Cinnamon Whipped Cream
Ingredients:
1 cup heavy cream, chilled
1/4 cup confectioners' sugar
1 tsp vanilla extract
1 tsp ground cinnamon

Pour the heavy cream into a large bowl and beat with an electric hand mixer until thick and frothy. Add the confectioners' sugar, vanilla and cinnamon, and beat until medium peaks form.
 Still cooling in the pan


after being chilled in the refrigerator overnight.


Spread cinnamon whipped topping.
(i also topped with grated semi-sweet chocolate)

Notes:
Avoid over-beating the batter. Over-beating incorporated additional air and tends to cause cracking on the surface of the cheesecake.

Wednesday, November 24, 2010

Oven Fried Chicken


My mum loves fried chicken and so do I. Especially those crispy ones. hmm.. yum-yum.. But I don't quite like them being deep-fried, too greasy. I hate to use napkins to wipe off some of the grease. Believe me, before when I ate fried chicken, I got into the habit of wiping off the grease before putting it into my mouth.. haha... 
I was delighted when I found out about oven fried chicken. Crispy and delicious, oven fried chicken is much healthier than any traditional fried chicken. You can eat these oven fried chicken by itself or make it into a sandwich.

With the mini buns that I made yesterday, we had chicken sandwiches. I sauteed onions and mushroom to go on top of the chicken.  Delicious oven fried chicken sandwich with sauteed onions and mushrooms... ohh don't forget the cheese.. hehe.. :)

Oven Fried Chicken 
(adapted from Food Network)

Ingredients:
1 1/3 cup cornflakes
1 cup toasted white bread
1 tbsp virgin oil
1 tsp kosher salt
1/2 tsp paprika
1/2 tsp freshly ground black pepper
1/2 cup mayonnaise
1 tsp ground mustard
4 skinless chicken pieces (about 6 ounces each) 

*(I used skinless chicken breast and cut into half)

Preheat the oven to 400 degrees F. Set a rack on a foil lined baking sheet. Spray the rack generously with cooking spray. Finely grind the cereal and toast together in a food processor. Transfer the crumbs to a large gallon size plastic bag. Add the oil, salt, paprika, and ground pepper and toss to mix thoroughly. Whisk the mayonnaise and mustard together in a medium shallow bowl. Add chicken to mayonnaise mix and turn to coat all the pieces evenly. Drop the chicken into the plastic bag, seal and shake until each piece is evenly coated. Drizzle some virgin oil, and bake for about 30-40 minutes or until the coating crisps and browns. Transfer to a platter and serve hot or at room temperature.


**P.S: Remember, I said I will post about the Eid-ul Adha food, well I'm very sorry I did not post anything on that. Last minute, I did not cook anything special. We just had Sambal Tumis Ayam and Kentang (Spicy Chicken and Potato Chilli based Sauce) with white rice. :)

Tuesday, November 23, 2010

Easy Homemade Bread


I love the smell of fresh bread from the oven. It just made me impatient for a fresh slice of buttered bread.. Yum! YuM!! But today, something is not right with my sense of smell.. I cannot smell it. I was waiting for it but it never come.. My hubby came back home from work just a few minutes after I took the bread out of the oven. He was standing by the front door and asked "you baked?" I replied, "yes, I did." He said fresh bread without even going to the kitchen and I was like how did you know, I cant smell it. All I smell was from the silicone loaf pan.. haha..

I do not have a mixer stand to help me so I had to use a large bowl and a wooden spoon. How about bread machine?? I am not sure about bread machine, right now, I'm happy to bake the bread from the oven. Well, maybe in the future but all these appliances are in my wish-list.. *wink-wink* hehe... 

After much research on making homemade fresh bread, I found the recipe and the method below is the best. The thing I like this recipe, is that its easy, you do not have to spend a lot of time. Even my hubby prefers  homemade fresh bread than the ones we get from the store. Next time, I'll be able to add a variety of interesting ingredients to create a unique and flavorful breads. Thanks to Oliviaskitchen for this easy recipe.

Ingredients:
600g strong white bread flour 
1 pkg (7g) dry yeast
1 tsp brown sugar
2 tsp salt
400ml lukewarm water
3 tbsp melted butter

In a large bowl, combine the dry ingredients. Slowly add the lukewarm water about 300ml (you might not need all 400ml) and melted butter. (you'll know when you added the right amount of water, all the flour will come together). Stir until there is no loose flour and not too wet. Then on a floured surface, knead the dough by forming a fist and push the dough away and bring it back for about 5 minutes. Put the dough in a loaf tin or divide into small rolls. Cover with a clean tea towel and leave to rise in a warm place for approx 1 hour, or until the dough has doubled the size. Bake in the preheated oven 400 degrees F for 30 minutes.

Notes: 
  • If the dough is too wet, add a little bit more of flour and  if the dough is too dry, add a little bit more of water.
  • For crusty bread, store it in a brown paper bag or let it just sit on the counter. Don't use a plastic wrap because it will soften the crust and preserve the moist interior.
  • If the bread goes stale, moisten the outside with water, use a spray bottle or sprinkling it with your hands. Heat it in a 400 degrees F preheated oven for about 15 minutes.

Related Posts Plugin for WordPress, Blogger...