Saturday, November 29, 2008

Cookie Carnival (November) - The Ultimate Chewy and Soft Chocolate Chunk Cookies


Due to my busy schedule last month, I had to forgo the challenge but, this month, I must not!Its easy and its definately my favorite cookies!!!

Kate from The Clean Plate Club has chosen THE ULTIMATE CHEWY and SOFT CHOCOLATE CHUNK COOKIES from Regan Daley from her absolutely fabulous MUST-HAVE book, In The Sweet Kitchen. I don't have this book yet but I will get it someday. I have plenty of cookies recipe books and I don't mind to add another book to the collection.. :)

To make the cookies were very easy and simple and very yummy! The texture and very chocolaty.... I even add extra bitter-sweet chocolate chips to the mixture... hehe... I only made 1 dozen of the cookies and save the rest for later... Within the same day, all the 1 dozen cookies were gone!


The Ultimate Chewy and Soft Chocolate Chunk Cookies

INGREDIENTS

1 cup unsalted butter at room temp
1 cup tightly packed light brown sugar
1/2 cup granulated sugar
2 large eggs
1 1/2 tsps. pure vanilla extract
3 cups plus 2 tbsp. all-purpose flour
1 tsp. baking soda
1/2 tsp. salt
16 oz. flavorful bitter or semi-sweet chocolate, coarsely chopped

INSTRUCTIONS

1. Preheat oven to 350 F. Line two baking sheets with parchment paper, or lightly butter them, and set aside. In the bowl of an electric mixer, or stand mixer fitted with paddle attachment, or a large bowl if mixing by hand, cream the butter and sugars until light and fluffy. Add the eggs, one at a time, beating well and scraping down the sides of the bowl after each addition. Beat in the vanilla.

2. Sift the flour, baking soda and salt together in a small bowl. Add the dry ingredients to the butter-sugar mixture, and mix until just combined. Fold in the chocolate chunks.

3. Using your hands, shape knobs of dough about the size of a large walnut and place them 2 inches apart on the baking sheets. (I use 2 spoons to scoop the dough thou) Stagger the rows of cookies to ensure even baking. Bake 12-15 for smaller cookies, 14-17 for larger ones or until the tops are a light golden brown. If the cookies are neither firm nor dark when they are removed from the oven, they will cool chewy and soft. Cool the cookies on the sheets for 5 minutes, then transfer to wire racks to cool completely. If somehow they don't get inhaled immediately, they may be stored airtight at room temperature for up to one week.

ENJOY!

DB's November Challenge: Caramel Cake with Caramelized Butter Frosting


It seems like my baking skill in unconsistence! I need to work on my baking skill, especially when baking a cake! Maybe I should go for baking lessons or bake more often. I wish I could but I'm so busy with work and preparing for my wedding, I just couldnt have the time to bake more often nowadays..

Anyhoo, this month sugar is the Star of the party. Host by Dolores of Culinary Curiosity, co-host by Alex (Brownie) of the Blondie & Brownie, Jenny of Foray into Food and also for alternative baking, Natalie of Gluten-a-Go-Go.

This month recipe courtesy by author, Shuna Fish Lydon of Eggbeater and her signature caramel cake, a homemake caramel syrup (sooo sweet). There's also an optional challenge: Alice Medrich’s Golden Vanilla Bean Caramels, with LOTS of variation but I decided not to make it. :(

I also added some sweet strawberries and nutella spread and top with Caramel frosting... Hmm... Yummy

And now…THE RECIPES:
CARAMEL CAKE WITH CARAMELIZED BUTTER FROSTING

10 Tablespoons unsalted butter at room temperature
1 1/4 Cups granulated sugar
1/2 teaspoon kosher salt
1/3 Cup Caramel Syrup (see recipe below)
2 each eggs, at room temperature
splash vanilla extract
2 Cups all-purpose flour
1/2 teaspoon baking powder
1 cup milk, at room temperature

Notes from Natalie for those of you baking gluten-free:
So the GF changes to the cake would be:
2 cups of gluten free flour blend (w/xanthan gum) or 2 cups of gf flour blend + 1 1/2 tsp xanthan or guar gum
1/2 - 1 tsp baking powder (this would be the recipe amount to the amount it might need to be raised to & I'm going to check)

1. Preheat oven to 350F.

2. Butter one tall (2 – 2.5 inch deep) 9-inch cake pan.

3. In the bowl of a stand mixer fitted with a paddle attachment, cream butter until smooth. Add sugar and salt & cream until light and fluffy.

4. Slowly pour room temperature caramel syrup into bowl. Scrape down bowl and increase speed.

5. Add eggs/vanilla extract a little at a time, mixing well after each addition. Scrape down bowl again, beat mixture until light and uniform.

6. Sift flour and baking powder.

7. Turn mixer to lowest speed, and add one third of the dry ingredients. When incorporated, add half of the milk, a little at a time. Add another third of the dry ingredients, then the other half of the milk and finish with the dry ingredients. {This is called the dry, wet, dry, wet, dry method in cake making. It is often employed when there is a high proportion of liquid in the batter.}

8.Take off mixer and by hand, use a spatula to do a few last folds, making sure batter is uniform. Turn batter into prepared cake pan.

9. Place cake pan on cookie sheet or 1/2 sheet pan. Set first timer for 30 minutes, rotate pan and set timer for another 15-20 minutes. Your own oven will set the pace. Bake until sides pull away from the pan and skewer inserted in middle comes out clean. Cool cake completely before icing it.

10. Cake will keep for three days outside of the refrigerator.

CARAMEL SYRUP
2 cups sugar
1/2 cup water
1 cup water (for "stopping" the caramelization process)

In a small stainless steel saucepan, with tall sides, mix water and sugar until mixture feels like wet sand. Brush down any stray sugar crystals with wet pastry brush. Turn on heat to highest flame. Cook until smoking slightly: dark amber.
When color is achieved, very carefully pour in one cup of water. Caramel will jump and sputter about! It is very dangerous, so have long sleeves on and be prepared to step back.Whisk over medium heat until it has reduced slightly and feels sticky between two fingers. {Obviously wait for it to cool on a spoon before touching it.}

Note: For safety reasons, have ready a bowl of ice water to plunge your hands into if any caramel should land on your skin.


CARAMELIZED BUTTER FROSTING
12 tablespoons unsalted butter
1 pound confectioner’s sugar, sifted
4-6 tablespoons heavy cream
2 teaspoons vanilla extract
2-4 tablespoons caramel syrup
Kosher or sea salt to taste

Cook butter until brown. Pour through a fine meshed sieve into a heatproof bowl, set aside to cool. Pour cooled brown butter into mixer bowl. In a stand mixer fitted with a paddle or whisk attachment, add confectioner's sugar a little at a time. When mixture looks too chunky to take any more, add a bit of cream and or caramel syrup. Repeat until mixture looks smooth and all confectioner's sugar has been incorporated. Add salt to taste.

Note: Caramelized butter frosting will keep in fridge for up to a month.To smooth out from cold, microwave a bit, then mix with paddle attachment until smooth and light (recipes above courtesy of Shuna Fish Lydon)


~ OPTIONAL ~
GOLDEN VANILLA BEAN CARAMELS
- makes eighty-one 1-inch caramels -
Ingredients
1 cup golden syrup
2 cups sugar
3/8 teaspoon fine sea salt
2 cups heavy cream
1 1/2 teaspoons pure ground vanilla beans, purchased or ground in a coffee or spice grinders, or 1 tablespoon plus 1 teaspoon pure vanilla extract
3 tablespoons unsalted butter, cut into chunks, softened

Equipment
A 9-inch square baking pan
Candy thermometer

Procedure
Line the bottom and sides of the baking pan with aluminum foil and grease the foil. Combine the golden syrup, sugar, and salt in a heavy 3-quart saucepan and cook over medium heat, stirring with a silicone spatula or wooden spoon, until the mixture begins to simmer around the edges. Wash the sugar and syrup from the sides of the pan with a pastry brush dipped in water. Cover and cook for about 3 minutes. (Meanwhile, rinse the spatula or spoon before using it again later.) Uncover the pan and wash down the sides once more. Attach the candy thermometer to the pan, without letting it touch the bottom of the pan, and cook, uncovered (without stirring) until the mixture reaches 305°F. Meanwhile, combine the cream and ground vanilla beans (not the extract) in a small saucepan and heat until tiny bubbles form around the edges of the pan. Turn off the heat and cover the pan to keep the cream hot.

When the sugar mixture reaches 305°F, turn off the heat and stir in the butter chunks. Gradually stir in the hot cream; it will bubble up and steam dramatically, so be careful. Turn the burner back on and adjust it so that the mixture boils energetically but not violently. Stir until any thickened syrup at the bottom of the pan is dissolved and the mixture is smooth. Continue to cook, stirring occasionally, to about 245°F. Then cook, stirring constantly, to 260°f for soft, chewy caramels or 265°F; for firmer chewy caramels.

Remove the pan from the heat and stir in the vanilla extract, if using it. Pour the caramel into the lined pan. Let set for 4 to 5 hours, or overnight until firm.

Lift the pan liner from the pan and invert the sheet of caramel onto a sheet of parchment paper. Peel off the liner. Cut the caramels with an oiled knife. Wrap each caramel individually in wax paper or cellophane.

Variations

Fleur de Sel Caramels: Extra salt, in the form of fleur de sel or another coarse flaked salt, brings out the flavor of the caramel and offers a little ying to the yang. Add an extra scant 1/4 teaspoon of coarse sea salt to the recipe. Or, to keep the salt crunchy, let the caramel cool and firm. Then sprinkle with two pinches of flaky salt and press it in. Invert, remove the pan liner, sprinkle with more salt. Then cut and wrap the caramels in wax paper or cellophane.

Nutmeg and Vanilla Bean Caramels: Add 1/2 teaspoon freshly grated nutmeg to the cream before you heat it. Cardamom Caramels: Omit the vanilla. Add 1/2 teaspoon slightly crushed cardamom seeds (from about 15 cardamom pods) to the cream before heating it. Strain the cream when you add it to the caramel; discard the seeds.

Caramel Sauce: Stop cooking any caramel recipe or variation when it reaches 225°F or, for a sauce that thickens like hot fudge over ice cream, 228°F. Pour it into a sauceboat to serve or into a heatproof jar for storage. The sauce can be stored in the refrigerator for ages and reheated gently in the microwave or a saucepan just until hot and flowing before use. You can stir in rum or brandy to taste. If the sauce is too thick or stiff to serve over ice cream, it can always be thinned with a little water or cream. Or, if you like a sauce that thickens more over ice cream, simmer it for a few minutes longer. (recipe from Alice Medrich's Pure Dessert)


If you’re looking for additional guidance on the cake, Shuna’s got some great information posted here as well (http://eggbeater.typepad.com/shuna/2007/11/caramel-cake-a.html) and here (http://blogs.kqed.org/bayareabites/2006/12/24/caramel-cake-the-recipe/). And metric conversions can be found here (http://www.worldwidemetric.com/metcal.htm).

Shuna's notes:

This is one of those cakes that is truly about baking. It may sound strange because aren't all cakes about baking? What I mean is that getting this cake to bake is about balancing fat with acid and protein JUST RIGHT. Gluten free flours are going to have a hard time getting this cake to work. Not impossible, for nothing is impossible these days with all the chemical (natural and icky) at our fingertips, but very very tricky. One hint for the gluten free baker-- liquid Lecithen is your friend.It would be very easy to get various other flavours in the caramel cake but what's tricky is making sure the flavour does not screw up the liquid-fat-flour ratio too much. Ideas/flavours: Browned Butter, vanilla bean, rosemary, burnt orange, warm spices, etc. Just remember: various flavouring ingredients and agents carry with them their own acidity and moisture contents...Flavour imparting ingredients can be poached in the caramel once it's done. Even a cold steep would be good with some highly aromatic ingredients, like coffee beans or rosemary. One could make scented sugar and use that in tandem with the sugar in the recipe.But I will say this about flavours: you will hide and lose the subtlety of the caramel flavour in the cake and that's what this cake is about.


Saturday, November 01, 2008

Sweet & Simple Bakes (October) - Spooktacular - Halloween - Cupcakes

It's HALLOWEEN. I still remember when I was still working at Loof Bar last year, I had those artistic make up done by the expert. hehe..
Anyway for this month's challenge, it was Spooktacular - Halloween Cupcakes. My attempt to make this month's challenge, was good but not as spooky as what Rosie and Maria (Sweet and Simple Bakes) mentioned in the post. Well, by adding raisins and chocolate chip to the mixture, is that creative too?? Hmm.. I do not have the witch cookie cutter or pumpkin cookie cutter or the black color icing to decorate my cupcake. I used grapefruit icing and added orange color to it. The cut-outs were actually real cookie that I baked separately (unfortunately, they were slightly burnt because I forgot to turn the oven temperature down... lol). Besides using the normal cupcake cases, I used the mini paper cupcakes cases too because they look so cute.. mini.. ;)

Spooktacular - Halloween - Cupcakes!
Makes approximately 12 cupcakes

Ingredients
175g (6 oz / 1 &1/3 cups) self-raising flour
175g (6 oz /1 &1/2 sticks) butter, at room temperature
175g (6 oz / 1 cup) of caster sugar
3 eggs
1 tsp vanilla extract
3 - 4 tbsp milk
Icing/frosting of your choice – go wild and make a statement
Decorations of your choice – the spookier the better :)

You will need a 12 hole-muffin tin and 12 cupcake paper cases

Method
Preheat the oven to 200°C/fan180°C/400°F/Gas Mark 6. Line a 12 hole-muffin tin with cupcake paper cases.

Sieve the flour into a bowl and leave aside. In a large mixing bowl add the butter and sugar and beat until the mixture becomes light in colour and fluffy. Add one egg at a time beating well between each addition. Beat in the vanilla extract and then gently fold in the flour until combined. Stir in the milk until you have a good dropping consistency. Spoon the mixture equally into the prepared muffin tin and place in the preheated oven. Bake for 20 -25 minutes or until risen and golden and a skewer inserted into the middle comes out clean. Transfer to a wire rack to completely cool.

Rosie’s notes:
1. Fill the cupcake paper cases no more than two-thirds full for the cupcakes to rise.
2. If the tops dome a little when completely cool, take a segregated knife and slice the domed tops off and discard, this enables flat tops for icing and decorations.
3. I have also measured my ingredients that I weighed out into cup measures as requested but please note if using, I cannot guarantee how accurate these measures are in cups.
4.
If using plain flour because you cannot acquire self-raising flour add 1½ tsp of baking powder to the plain flour.


Though my cupcakes are not as spooky as they should be, but I tell you, they taste great!!! I am sure to make more of these cupcakes.. Thank you Rosie and Maria for this great recipe! :)
Check out the rest for the Spooktacular - Halloween - Cupcakes!!

Anyhoo, for the month of October, I was unable to complete one challenge from Cookie Carnival. But do check out for the October Round-Up here!

Have a good weekend everyone! :)

Wednesday, October 29, 2008

DB's October Challenge - Pizza and Toppings


This month's challenge, hosted by sweet Rosa of Yummy Yums. She chose an easy pizza recipe from Peter Reinhart's “The Bread Baker's Apprentice”. I was so excited when I found out about this month's challenge... It's perfect!!!! Currently, the place I worked for is a pizza place. Hence, I asked the supervisor if I could use their kitchen for my challenge. She approved and I was so excited.. Of course, I used the recipe provided, bought some ingredients for the toppings and did all on my own.

For this challenge, I wanted to make one dessert pizza (blueberry) and one white pizza (caesar dressing). I used their toppings for the rest of the dough. There is one interesting rule for this challenge. The challenge was to use the tossing method. I thought that I will never be able to make it or my dough will never turn out well. At first, I thought of just skip the tossing method but decided to go for it. It was a little hard at first but from the second toss onwards, I got the hang of it and I was like never wanted to stop and my dear sister who helped to snap the picture, had a hard time to snap when I tossed the dough.. LOL... Oh man, my pizza dough turned out great!


Here, Im trying to toss my dough..


Here are the photo of the pizzas:

Blueberry pizza. Unfortunately, my friend bought the wrong type. He got the blueberry with light syrup instead of the blueberry pie fillings.. But this is as good as the blueberry pie fillings.

I added some feta cheese on top of the blueberry. This one is caesar dressing with turkey ham, sweet pineapple, italian sausages, turkey bacon and cheese with sweet chilli sauce.... this is really good!!!


For the remaining dough, here are some photos................

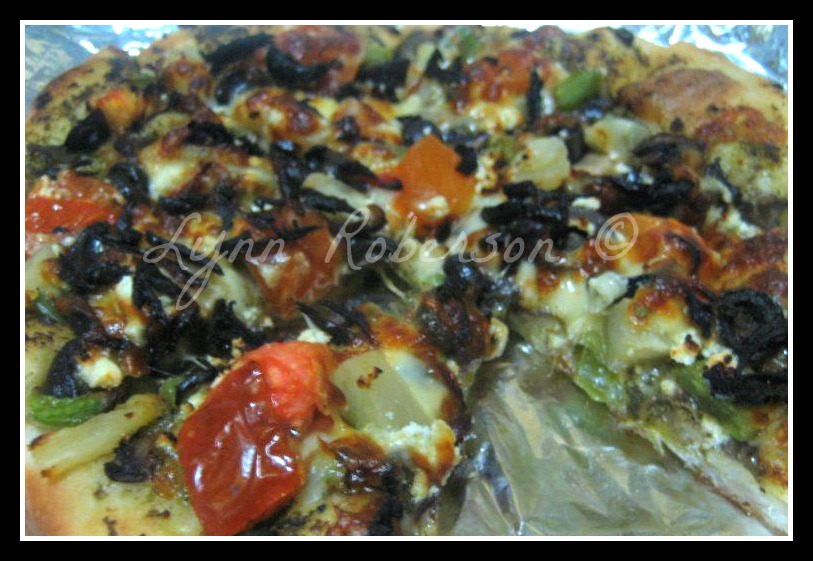
This is vegetarian pizza: tomatoes, pineapples, black olives, green peppers, feta, mozzarella with pesto sauce as the based. My sun-dried tomatoes got burnt, should have put them before the cheese. :(


This pizza is a mixed of black olives, mushrooms, chicken chunks,pineapples, green peppers, bbq sauce, mozzarella and cheddar cheese with yogurt based.


EQUIPMENT: Stand mixer with paddle and dough hook attachments (optional, see recipe), cooking thermometer, baking sheet, parchment paper, cooking oil, plastic wrap, pizza peel/scraper, pizza stone or pan.

RECIPE SOURCE: “The Bread Baker's Apprentice: Mastering The Art of Extraordinary Bread” by Peter Reinhart. Ten Speed Press, Berkeley, CA. Copyright 2001. ISBN-10: 1-58008-268-8, ISBN-13: 978-158008-268-6.


~ BASIC PIZZA DOUGH ~
Original recipe taken from “The Bread Baker’s Apprentice” by Peter Reinhart.
Makes 6 pizza crusts (about 9-12 inches).

Ingredients:
4 1/2 Cups (607.5 g) Unbleached high-gluten (%14) bread flour or all purpose flour, chilled
1 3/4 Tsp Salt
1 Tsp Instant yeast
1/4 Cup (60g) Olive oil or vegetable oil (both optional, but it’s better with)
1 3/4 Cups (420g or 420ml) Water, ice cold (40° F/4.5° C)
1 Tb sugar
Semolina/durum flour or cornmeal for dusting ( I omit this out)

Method:
DAY ONE
1. Mix together the flour, salt and instant yeast in a big bowl (or in the bowl of your stand mixer).

2. Add the oil, sugar and cold water and mix well (with the help of a large wooden spoon or with the paddle attachment, on low speed) in order to form a sticky ball of dough. On a clean surface, knead for about 5-7 minutes, until the dough is smooth and the ingredients are homogeneously distributed. If it is too wet, add a little flour (not too much, though) and if it is too dry add 1 or 2 teaspoons extra water.

NOTE: If you are using an electric mixer, switch to the dough hook and mix on medium speed for the same amount of time.The dough should clear the sides of the bowl but stick to the bottom of the bowl. If the dough is too wet, sprinkle in a little more flour, so that it clears the sides. If, on the contrary, it clears the bottom of the bowl, dribble in a teaspoon or two of cold water.The finished dough should be springy, elastic, and sticky, not just tacky, and register 50°-55° F/10°-13° C.

3. Flour a work surface or counter. Line a jelly pan with baking paper/parchment. Lightly oil the paper.

4. With the help of a metal or plastic dough scraper, cut the dough into 6 equal pieces (or larger if you want to make larger pizzas).

NOTE: To avoid the dough from sticking to the scraper, dip the scraper into water between cuts.

5. Sprinkle some flour over the dough. Make sure your hands are dry and then flour them. Gently round each piece into a ball.

NOTE:
If the dough sticks to your hands, then dip your hands into the flour again.

6. Transfer the dough balls to the lined jelly pan and mist them generously with spray oil. Slip the pan into plastic bag or enclose in plastic food wrap.

7. Put the pan into the refrigerator and let the dough rest overnight or for up to thee days.

NOTE: You can store the dough balls in a zippered freezer bag if you want to save some of the dough for any future baking. In that case, pour some oil(a few tablespooons only) in a medium bowl and dip each dough ball into the oil, so that it is completely covered in oil. Then put each ball into a separate bag. Store the bags in the freezer for no longer than 3 months. The day before you plan to make pizza, remember to transfer the dough balls from the freezer to the refrigerator.

DAY TWO
8. On the day you plan to eat pizza, exactly 2 hours before you make it, remove the desired number of dough balls from the refrigerator. Dust the counter with flour and spray lightly with oil. Place the dough balls on a floured surface and sprinkle them with flour. Dust your hands with flour and delicately press the dough into disks about 1/2 inch/1.3 cm thick and 5 inches/12.7 cm in diameter. Sprinkle with flour and mist with oil. Loosely cover the dough rounds with plastic wrap and then allow to rest for 2 hours.

9. At least 45 minutes before making the pizza, place a baking stone on the lower third of the oven. Preheat the oven as hot as possible (500° F/260° C).

NOTE: If you do not have a baking stone, then use the back of a jelly pan. Do not preheat the pan.

10. Generously sprinkle the back of a jelly pan with semolina/durum flour or cornmeal. Flour your hands (palms, backs and knuckles). Take 1 piece of dough by lifting it with a pastry scraper. Lay the dough across your fists in a very delicate way and carefully stretch it by bouncing it in a circular motion on your hands, and by giving it a little stretch with each bounce. Once the dough has expanded outward, move to a full toss.

11. When the dough has the shape you want (about 9-12 inches/23-30 cm in diameter - for a 6 ounces/180g piece of dough), place it on the back of the jelly pan, making sure there is enough semolina/durum flour or cornmeal to allow it to slide and not stick to the pan. (I used vegetable oil so that the dough doesnt stick to the pan)

12. Lightly top it with sweet or savory toppings of your choice.

NOTE ON SAUCE: Your sauce (any) should not be too thick as it will thicken in the hot oven. Less is more but make the less truly more by using quality ingredients.

13. Slide the garnished pizza onto the stone in the oven or bake directly on the jelly pan. Close the door and bake for abour 5-8 minutes.

14. Take the pizza out of the oven and transfer it to a cutting board or your plate. In order to allow the cheese to set a little, wait 3-5 minutes before slicing or serving.

Thank you to the supervisor, Yaz for letting me use kitchen and some of their ingredients for the pizza....

Thanks to this wonderful challenge, I think they were the best pizzas I ever made.. ;)

I hope everyone had a wonderful time making October's challenge as much as I did! :)

Monday, October 20, 2008

Amazing Chocolate Chips Cookies

A lot of people enjoy chocolate chip cookies or in general cookies. So I baked some chocolate chip cookies the other day. Everyone at home enjoyed these cookies. These delicious chocolate chips cookies were gone so quickly!!! It was gone within 2 days after I baked them. Its hard on the outside and soft in the inside. Even when I gave some to my cousin and my best friend, they said the cookies were gone fast too! hehe.. I did post about these chocolate chip cookies in livejournal before but now since I am using blogspot for my food blog, I should post these delicious chocolate chips cookies here too and share with everyone. Just too bad, I am unable to share these cookies with my fiance since we are so far away for now. :(

Here is the recipe.....

Ingredients:
1 cup butter, softened
1 cup white sugar
1 cup brown sugar
2 eggs
2 tsp vanilla essence
1 tsp baking soda
2 tsp hot water
1/2 tsp salt
3 cups all-purpose flour
1 cup semi-sweet chocolate chips
1 cup white chocolate chips
1 cup finely chopped pistachios (optional, in the photo, I did not use any nuts)

Instructions:
1. Preheat oven to 350 Deg

2. Dissolve baking soda in the hot water. Set aside. Cream together butter and both white and brown sugar until smooth. Add the eggs but one at a time, then stir in vanilla essence.

3. Add to the batter along with salt. Stir in flour, both white and chocolate chips and pistachios. Mix well.

4. Drop by large spoonful onto the cookie sheets.

5. Bake for 10 minutes or until the edges are nicely browned.

Cheers! :)

Related Posts Plugin for WordPress, Blogger...